In this tutorial, I will show you how to use Thrive Architect to create a blog post from scratch. As a pre-requisite, you should first consume the lesson before this.
Let's go through the process of how to create a new blog post (review) using Thrive Architect.
Note: your blog post/review should already be completely written, ideally free of errors. If you want to learn how to write content fast, here's a complete course on how you can do it!
Get your blog post ready.
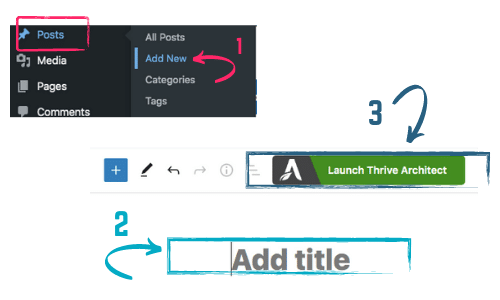
Click on the Posts > Add New button in your WordPress Dashboard to start with a blank post.
1. Enter A Title For Your Blog Post
Copy the title of your blog post from your Google Docs or wherever you saved it, and paste it to the "Title " field. Launch Thrive Architect after.
2. Create A Text Element
On the top right part, select +, then "Text."
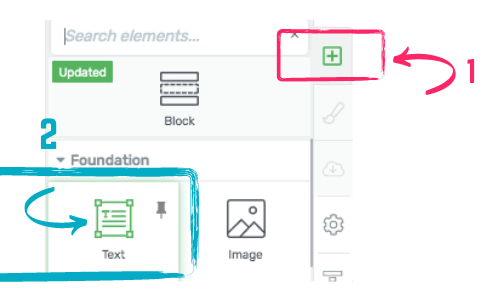
It's going to create a text box where you can paste your finished blog post. Paste your blog post in this text box.

3. Add The Necessary Spaces
For readability purposes, break down your paragraphs into small chunks. I'd normally set the number of lines to a maximum of 4 lines because long paragraphs can be exhausting to read.
Pressing the "enter" bar on your keyboard will automatically create spaces between paragraphs, not unlike in the Gutenberg Editor where you still need to create a "Spacer " block for every white space you want to create.
4. Set The Correct Headings
If your final blog post is saved in Google Docs, it is ideal to create the proper headings there so everything is already set before pasting it to your Thrive Architect.
If not, simply select the text or phrase and change them to H2, H3, or H4 as needed.
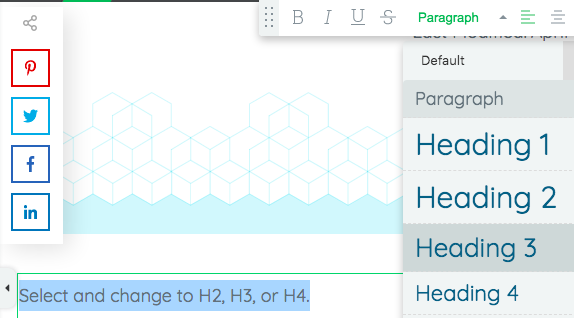
To check if your headings (H2, H3, and H4s) are in line with the safe SEO practices, check out my other lesson on how to optimize a post for SEO.
5. Add Image
Whenever you find it necessary, insert an image to your blog post to illustrate the concepts you are discussing.
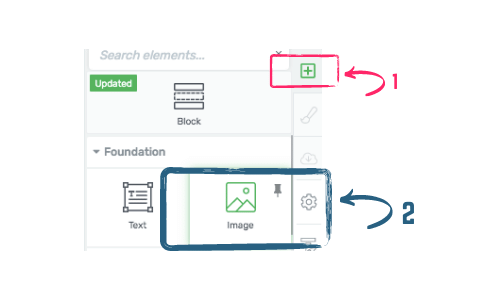
From the previous lesson, we tackled how to create reusable templates so you don't need to start from scratch. You can use the ready-made image template by inserting it into your blank canvas when needed.
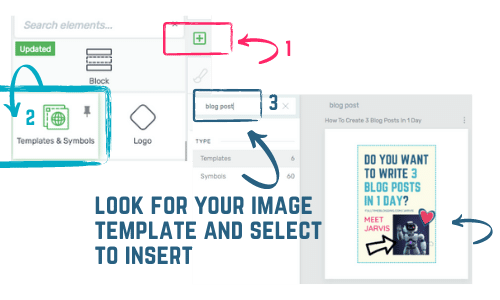
Don't forget to press "Unlink " if you intend to replace the image with a new one.
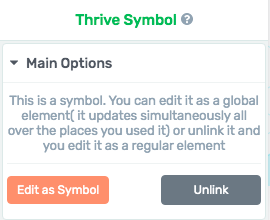
Leave it linked if it's a repeating template such as a customized banner that you want to promote on every blog post.
6. Add Video
A picture is worth a thousand words, but there are some things that just can't be done with still images. Sometimes, it's helpful for readers if they see what you're talking about!
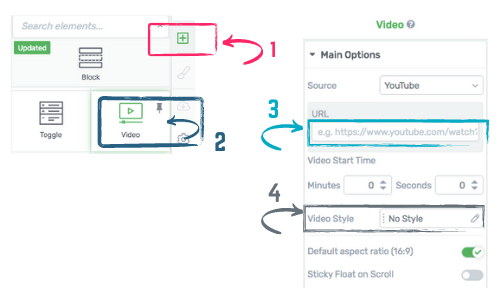
To insert a video from scratch, select + then "Video."
On the left side, paste the YouTube link and customize the look of the video holder (there are several templates).
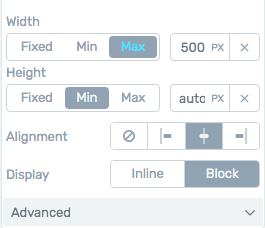
Set the video width to a maximum of 500 px. Don't worry, by default, there's an option to set it to fullscreen if your visitor finds it too small. Like images, a large video embedded in your site can drag your website speed down.
You can centralize it too so it looks good not just in desktop but also in mobile and tablet.
You can upload your own video on YouTube or get an existing Youtube video's share link to embed.
Save your video as a template so you can reuse it everytime you need to insert a video.
7. Call To Action
This is my favorite part of using the Thrive Architect. It makes the "Call To Actions " Stand Out - Like This...
Check out Wealthy Affiliate!
Or this...
Try Wealthy Affiliate Premium for $19*
*instead of $49 on your first month. Cancel anytime.
You can also insert your saved "Call To Action " template such as asking your readers to view a product's price when necessary.
You don't have to start from scratch because you already have a template. All you have to do is unlink the template and change the link you are pointing it to.
8. Insert A Text Link
To create a text link, select a word or phrase that you want to create a link for. Then, select the link icon in the formatting toolbar on top. Enter the URL that you want your viewers to be taken to when they click on this word or phrase.

If it's an internal link(or a link to one of your articles), do not tick the "open in new tab."
When you are pointing to a different website, it is recommended that you enable the "open in new tab."
We will discuss the "no follow" option in a separate lesson since it is an SEO concern. By default, leave it unselected.
9. For Comparison Reviews, Use A Table
For comparison reviews, it is a good idea to use tables for the information. It is also easier for readers to see comparable data side by side.
As per the previous lesson, you should know that it's important to have a saved template that can be used for formatting, instead of starting from scratch. It will help you compare items in the table more quickly and efficiently!
If you find it necessary, you can insert your other saved templates and change the information in them accordingly. Some of the other templates you can use for review are
- Star Ratings
- Click To Tweet (to invite readers to tweet something from your review)
- Countdown (to show that the item is not available forever)
- Testimonial (to show peoples' testimonials about the product/services)
- Pricing Table
Etc.
Once done, hit "Save and Return to Post Editor " on the lower left to do the final steps before publishing.
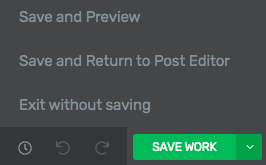
If you need to make changes, just launch the Thrive Architect editor again.
Here are points to check before you hit the publish button.
Ready to publish? You can either hit the "Publish" button right away on the top right or schedule it for a later date. 🙂

